Across living rooms and rented flats, amateur DIYers wage a quiet battle with crumbling plaster, mystery cavity walls and wobbly fixings. Many trust that drilling a neat hole and pushing in a plastic plug is all it takes. Then the coats, pans or TV arrive, and gravity settles the argument. Behind every solid fixing sits a more exact method than most weekend handymen use – and one clever technique that rarely gets explained in instruction leaflets.
Why most wall anchors fail long before the screw snaps
When a fixing gives way, people often blame the screw or the cheap plastic plug. In reality, the problem starts much earlier.
Most failed fixings come from a mismatch between anchor, wall type and drilling, not from the weight of the object itself.
Walls are not all created equal. A plug that grips perfectly in dense concrete can behave like chewing gum in soft plasterboard. Yet many people grab a “universal” plug, guess a drill bit, and hope.
Step one: know your wall before you pick a plug
Every reliable fixing starts with a simple question: what exactly am I drilling into?
- Solid concrete or stone: very hard, high load capacity, needs robust expansion plugs.
- Solid brick or dense block: generally strong, but the mortar joints can be weaker.
- Hollow brick or hollow block: voids inside, needs anchors that spread or lock across cavities.
- Plasterboard or stud walls: lightweight, relatively fragile, relies on specialised anchors or on the timber/metal studs.
A quick tap with the knuckles already tells a lot. A dull, heavy sound often signals solid masonry. A hollow, drum‑like echo suggests plasterboard or hollow block. Observing the dust while drilling the first test hole helps as well: fine white dust often comes from plaster, red grains from brick, grey gravelly dust from concrete.
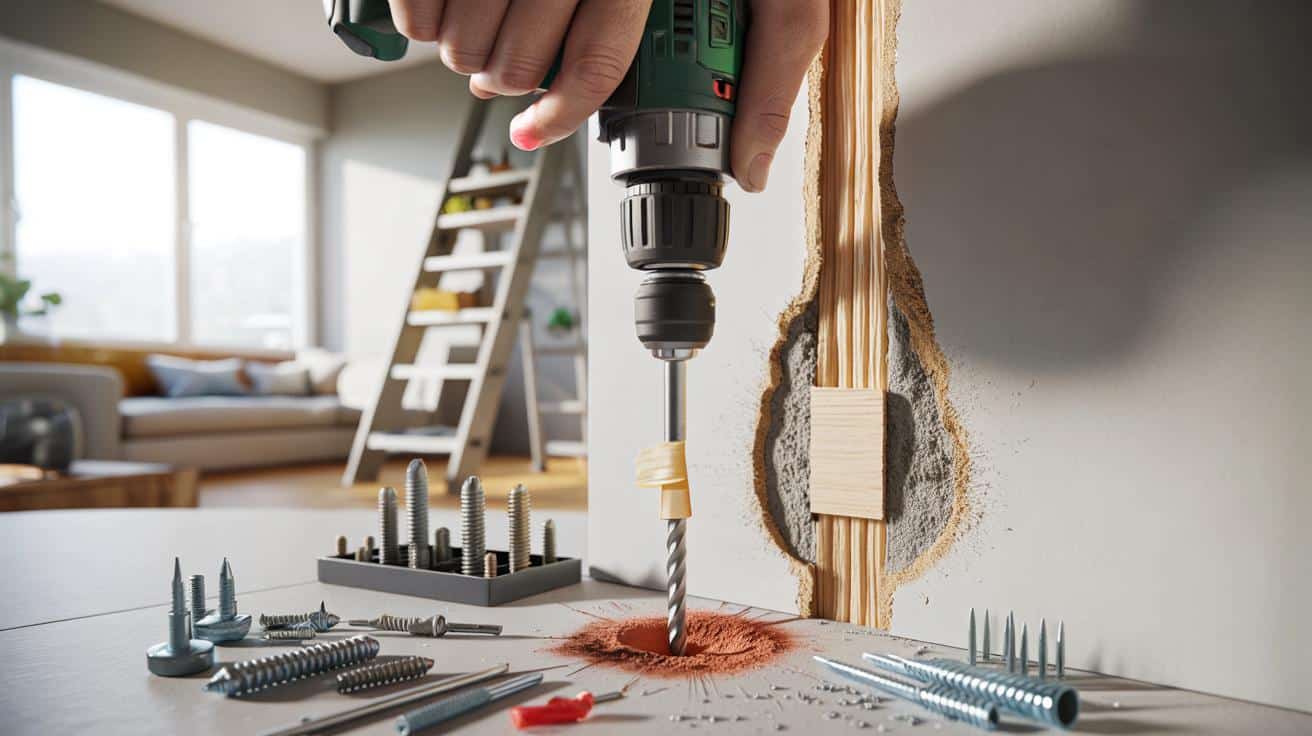
The “unknown” technique: make the wall work for you
The less‑talked‑about trick professionals use is simple: they modify the support behind the plug, not just the plug itself.
The pro move is to reinforce weak or hollow areas so the plug presses against a firm backer, rather than thin, fragile plaster.
In practice, that means adding material inside the cavity or across a damaged area so the plug can expand against something solid. On tired plasterboard or crumbly areas, pros will slip in a small wooden shim or a purpose‑made backing piece through a larger opening, then drill and plug through this new “spine”. It turns a flaky skin into a structural point.
➡️ Psychology explains what it means when you always forget people’s names
➡️ The pantry trick that keeps onions firm and fresh for nearly a month
➡️ Here is the first AI computer that fits in your pocket
➡️ A cosmic treasure in France: this meteorite contains grains older than the Sun
➡️ I make it every Sunday in winter”: the potato and Brussels sprout gratin my whole family fell for
For hollow brick, the same logic applies in a different way: they use long anchors that bridge the cavities and expand on the far side of the internal chamber, where the material is thicker.
Choosing the right anchor: not all plastic plugs are equal
Once the wall type is known and, if needed, reinforced, the next decision is the plug itself. Broadly, DIYers encounter four main families.
| Type of anchor | Best for | Main advantage |
|---|---|---|
| Standard expansion plug | Concrete, solid brick, dense block | Simple, strong grip when the hole is precise |
| Toggle / spring toggle | Plasterboard, hollow ceilings | Large wings spread load on the back of the board |
| Metal cavity anchor | Plasterboard, lightweight partitions | Crimps and locks firmly in thin panels |
| Special hollow brick plug | Perforated brick, hollow block | Expands or knots inside the cavities |
The temptation to use “universal” plugs for everything is strong. They can work, but only inside their comfort zone. For a heavy TV, kitchen cabinet or large mirror, purpose‑designed hardware pays off quickly.
Length and load: the quiet deal‑breakers
A plug that is too short can rip out like a loose tooth, especially from hollow or crumbly material. One that is too long may punch straight through a cavity, barely engaging with solid material.
A good rule: the plug should sit entirely in solid material, with space for its full expansion and for the screw tip.
Manufacturers usually list indicative load limits on packaging, but those figures assume perfect walls and perfect drilling. For older homes, cracks or damp areas, staying well below the stated maximum brings peace of mind.
Drilling like a pro: the millimetre that changes everything
Even the best anchor cannot save a sloppy hole. The drill bit diameter and depth must match the plug almost exactly.
Diameter and depth: no guessing allowed
The size is usually printed on the plug box: “8 mm” or “10 mm” indicates the drill bit to use. Ignoring that number is a recipe for trouble.
If the hole is too wide, the plug spins. If it is too narrow, the plug deforms, weakens and never expands correctly.
Depth matters just as much. A neat approach is to mark the required depth on the drill bit with a strip of tape, a few millimetres longer than the plug itself. That extra space prevents the tip of the plug bottoming out and compressing before fully expanding.
Clean holes hold better
Dust left in the hole acts like tiny ball bearings. The plug slides in, but the particles stop it gripping properly. Professionals routinely blow out the hole with a small pump, a can of air or the suction of a vacuum cleaner held just under the bit.
On very porous walls, some add a tiny amount of construction adhesive or chemical anchor resin before inserting the plug. That trick turns soft material into a rock‑hard sleeve once cured, though it makes later removal more complicated.
Small tricks that avoid big repairs
On tiled walls or freshly painted surfaces, a strip of masking tape over the drilling point keeps chips and hairline cracks at bay. The tape also helps the drill bit bite more quickly on slippery tiles.
Keeping the drill perfectly perpendicular to the wall reduces the risk of oval holes that weaken the fixing.
Using a sharp bit sounds obvious, yet many DIY attempts fail because the bit is glazed dull from years of use. A fresh masonry bit can transform the feel of drilling into concrete or brick and yields cleaner, more accurate holes.
Adapting to tricky walls and heavy loads
Not every wall behaves like a showroom sample. Older houses, converted lofts and patched‑up party walls demand extra care.
Dealing with weak plasterboard and damaged areas
Where plasterboard is cracked or crumbly around the drill site, normal plugs will simply crush the area further. The reinforcing technique takes centre stage here.
Cutting a slightly larger opening, inserting a snug wooden backing block, then fixing through it creates a hidden structural core inside the wall.
This approach is especially useful for coat racks by busy front doors or for shelving that sees regular movement. The load transfers to the hidden block, not the tired plasterboard surface.
When to seek studs instead of anchors
For very heavy items on plasterboard – full bookcases, kitchen cupboards, pull‑up bars – relying solely on cavity anchors is risky. A stud finder, or careful tapping and measurement, helps locate the timber or metal framing behind the board.
Screws driven directly into studs carry far more weight than any plug in bare plasterboard. Many professionals combine both methods: stud fixings take most of the load, while cavity anchors stabilise the rest of the frame.
Practical scenarios: how the method changes the outcome
The falling hallway shelf
Imagine a lightweight shelf above a radiator that keeps sagging. The homeowner has used small plastic plugs in what turns out to be hollow brick. Each time the heating season starts, the expansion and contraction of the wall finish the job the weak fixing began.
Switching to longer, hollow‑brick anchors that bridge the cavities, drilling to the recommended depth and clearing the dust can turn that same spot into a reliable support for coats and keys. No stronger screw is needed – just smarter anchoring.
The oversized bathroom mirror
In a bathroom with tiled plasterboard walls, a large mirror concentrates weight on only a few points. Standard plugs in the plasterboard are asking for trouble, especially with added humidity softening the board over time.
Here, the discreet trick combines several elements: masking tape on tiles for clean holes, sharp bits, metal cavity anchors that crimp behind the board, and, where possible, at least two fixings into studs. The result looks identical from the outside but feels unshakeable.
Jargon decoded: a brief guide for nervous DIYers
Hardware packaging can be cryptic. Two terms come up frequently with wall anchors.
“Expansion plug” refers to a plug that widens as the screw goes in, pressing outward against the sides of a solid hole. It relies on strong material, such as concrete or solid brick, to resist that pressure.
“Cavity anchor” covers the family of toggles, metal fold‑out anchors and specialist plugs designed to lock across gaps or thin panels. Rather than pushing outwards, they spread load across a larger back surface, working with the hollow space instead of fighting it.
Understanding this difference already narrows the choices and reduces random guesses in the tool aisle. Combined with the reinforcing trick and accurate drilling, it turns frustrating guesswork into a repeatable method, especially handy when long winter evenings make house tweaks strangely tempting.